Wiki › Dark Ages › Dungeons and Caves
Dungeons and Caves
This page contains spoilers. It shows the maps of every cave, dungeon, and hidden place in the game, including ones you may not have found yet. Everything stays hidden until you choose to open it.
Show every cave, dungeon, and hidden place (spoilers)
The maps are grouped by place, in the order you meet them. Every staircase is numbered on the map, and the table under each map says where it leads and which staircase you arrive at. Click a map to see it full size.
1 Stairs up 2 Stairs down 3 Exit
- Mountain Tunnel
- Crystal Mountains
- Dwarven Caves
- Dark Goblin Stronghold
- Laendlich Dungeon
- The Rift
- The New Continent and Greyor's Castle
Mountain Tunnel
The game shows a different version of the tunnel at different points in the story, so these three maps are the same place. They have no stairs: you walk in and out.
Mountain Tunnel 1
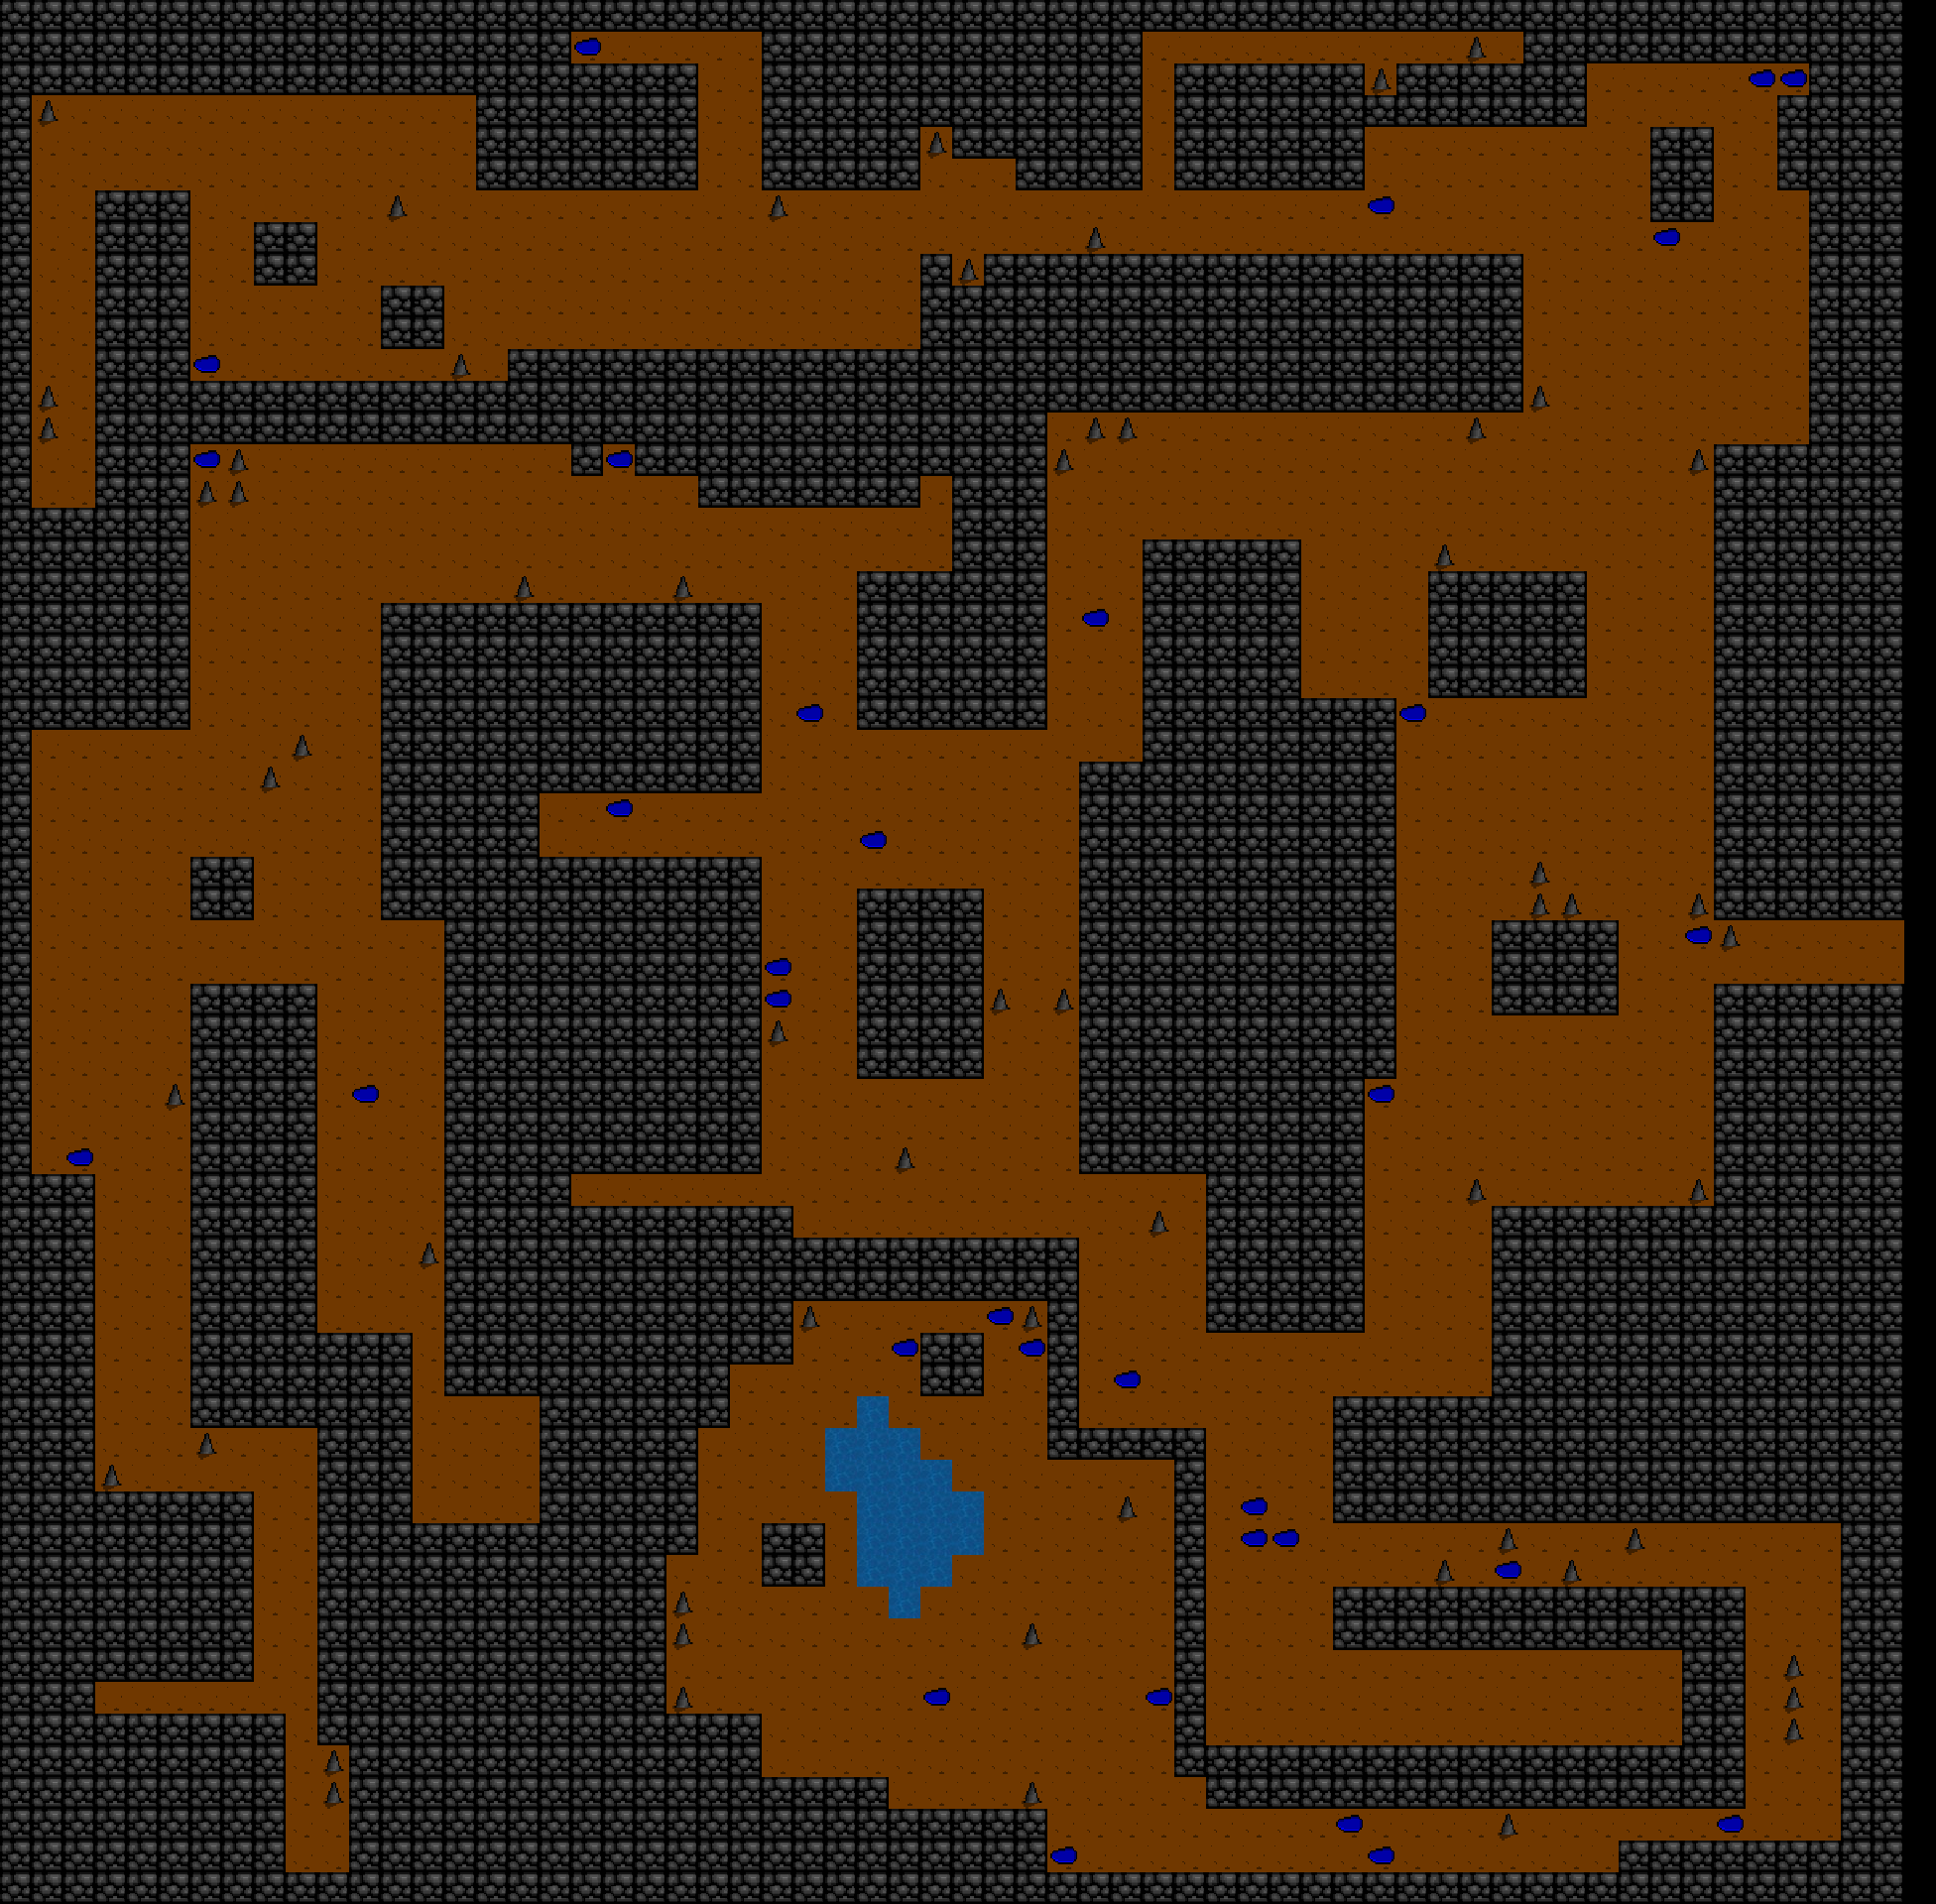
| # | Stairs | Leads to |
|---|---|---|
| 1 | Exit | Out to the world map |
| 2 | Exit | Out to the world map |
Mountain Tunnel 2
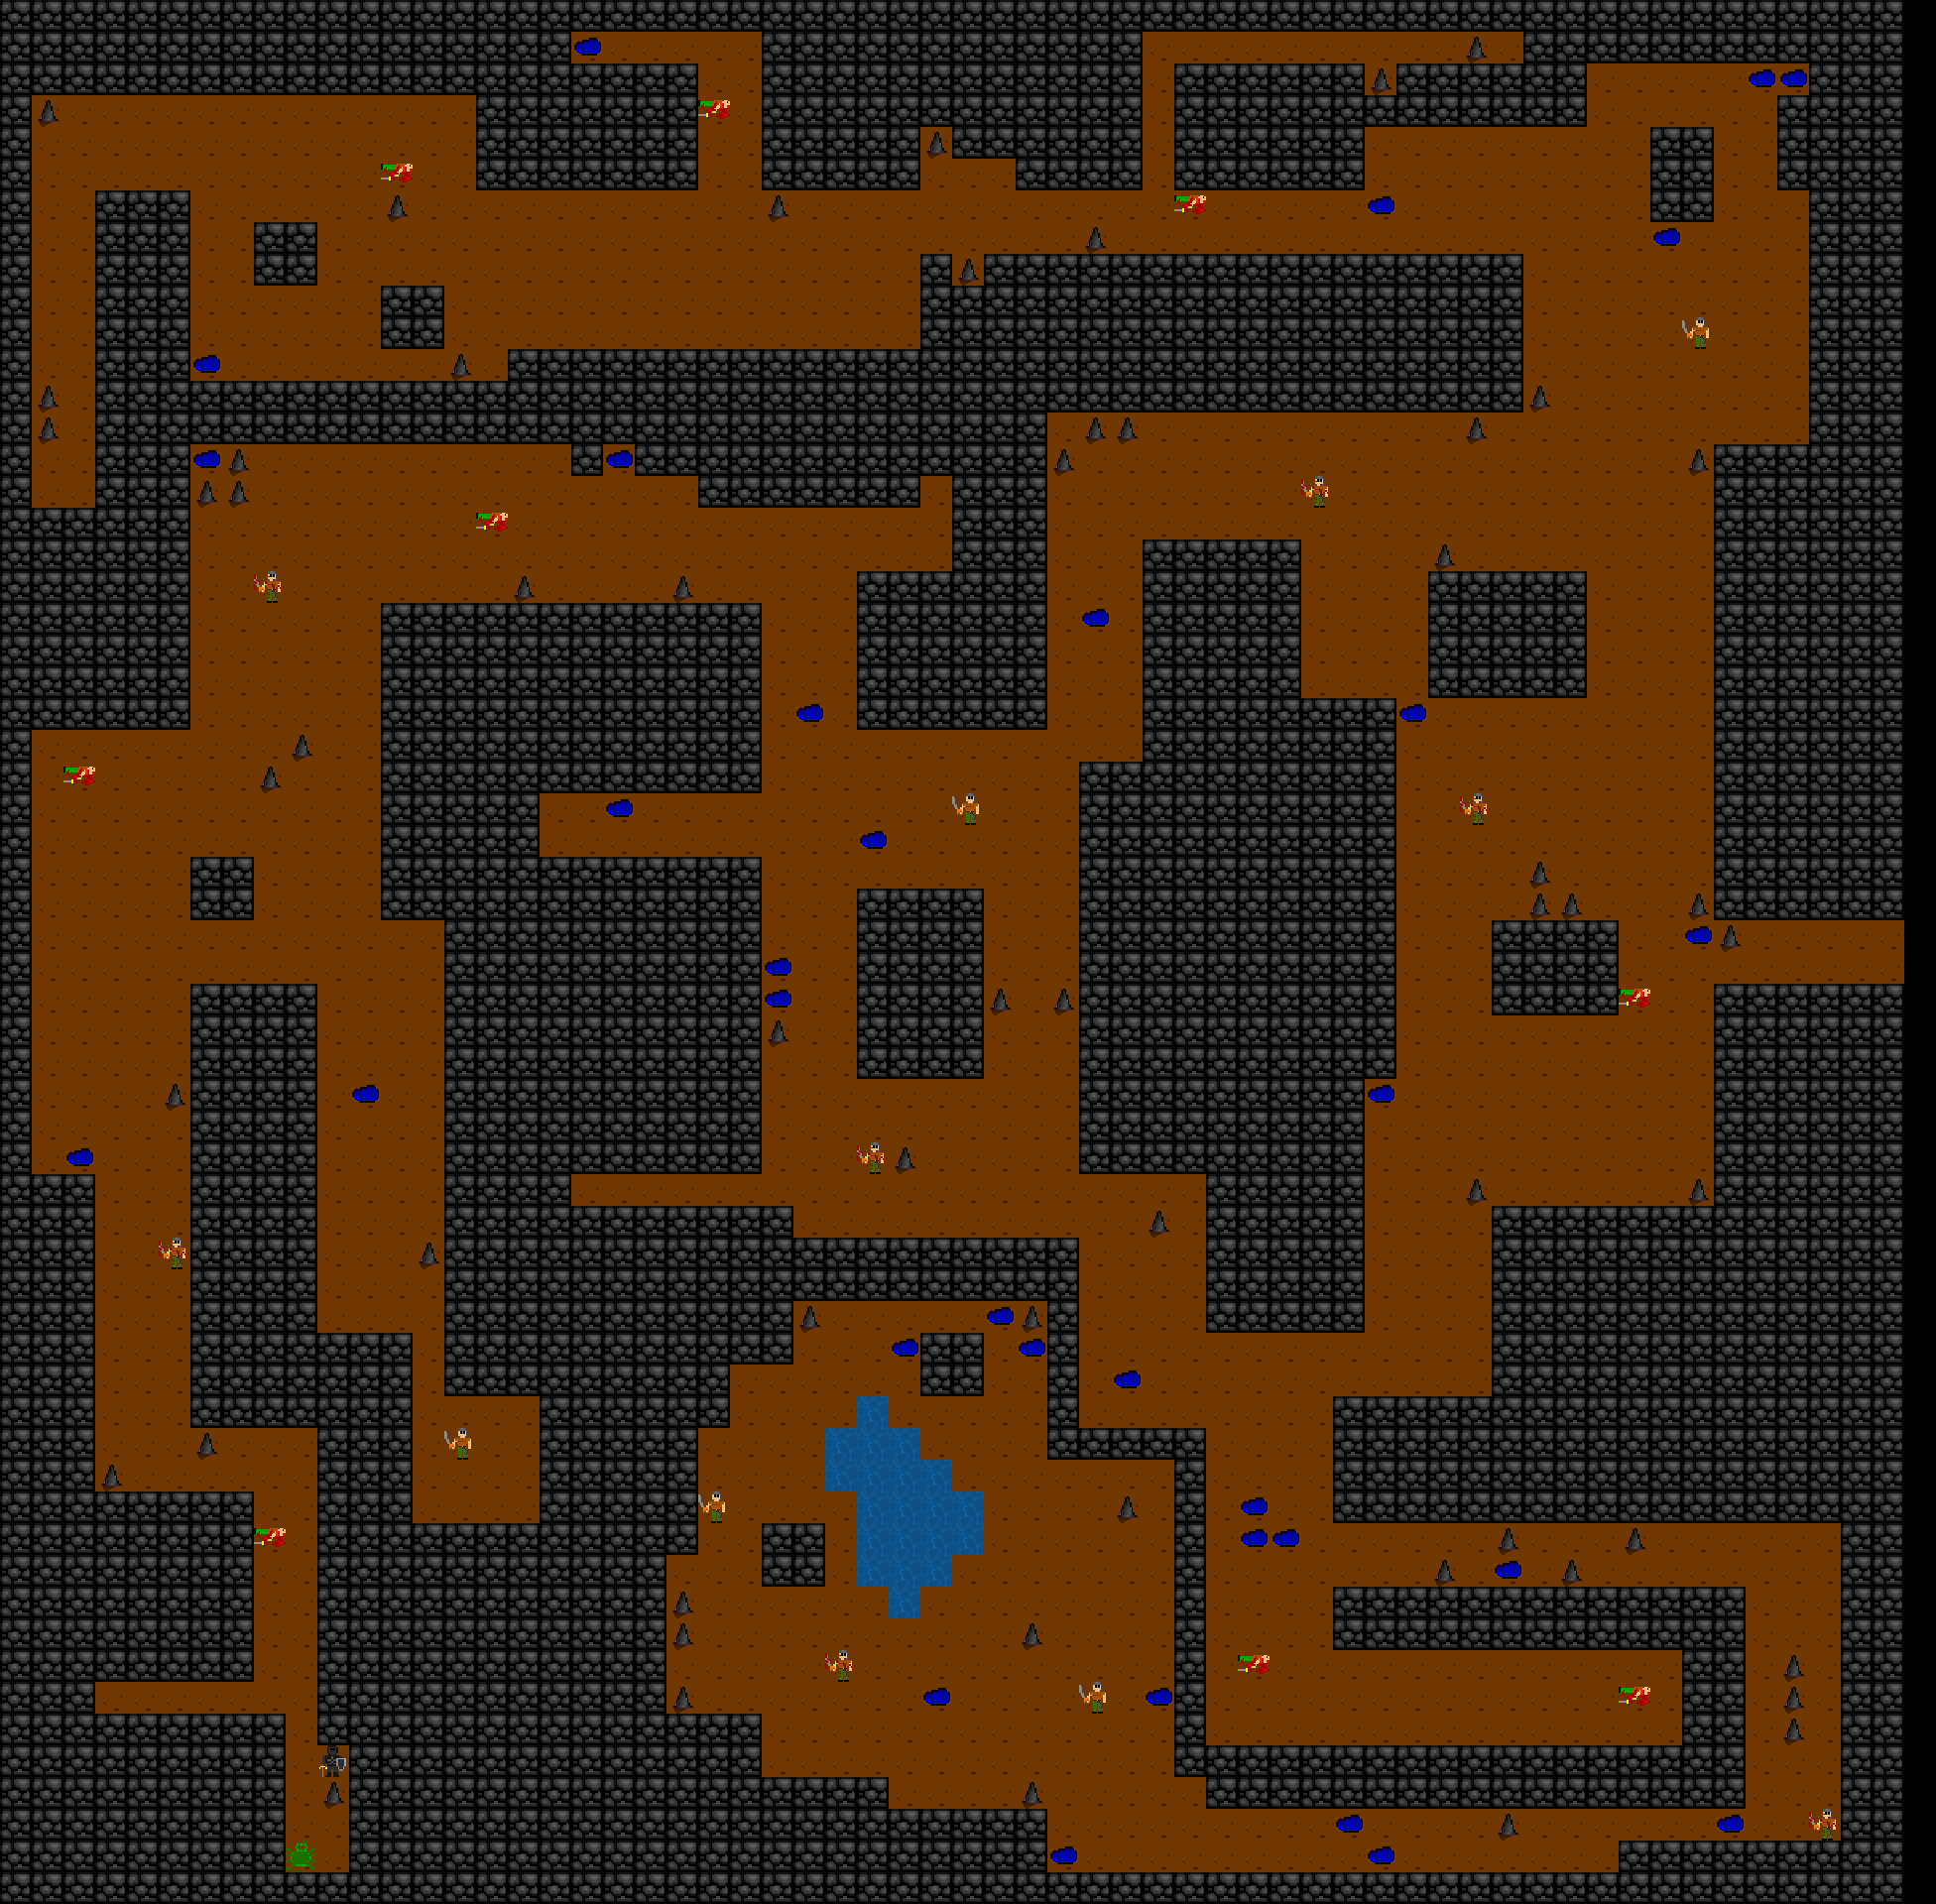
| # | Stairs | Leads to |
|---|---|---|
| 1 | Exit | Out to the world map |
| 2 | Exit | Out to the world map |
Mountain Tunnel 3
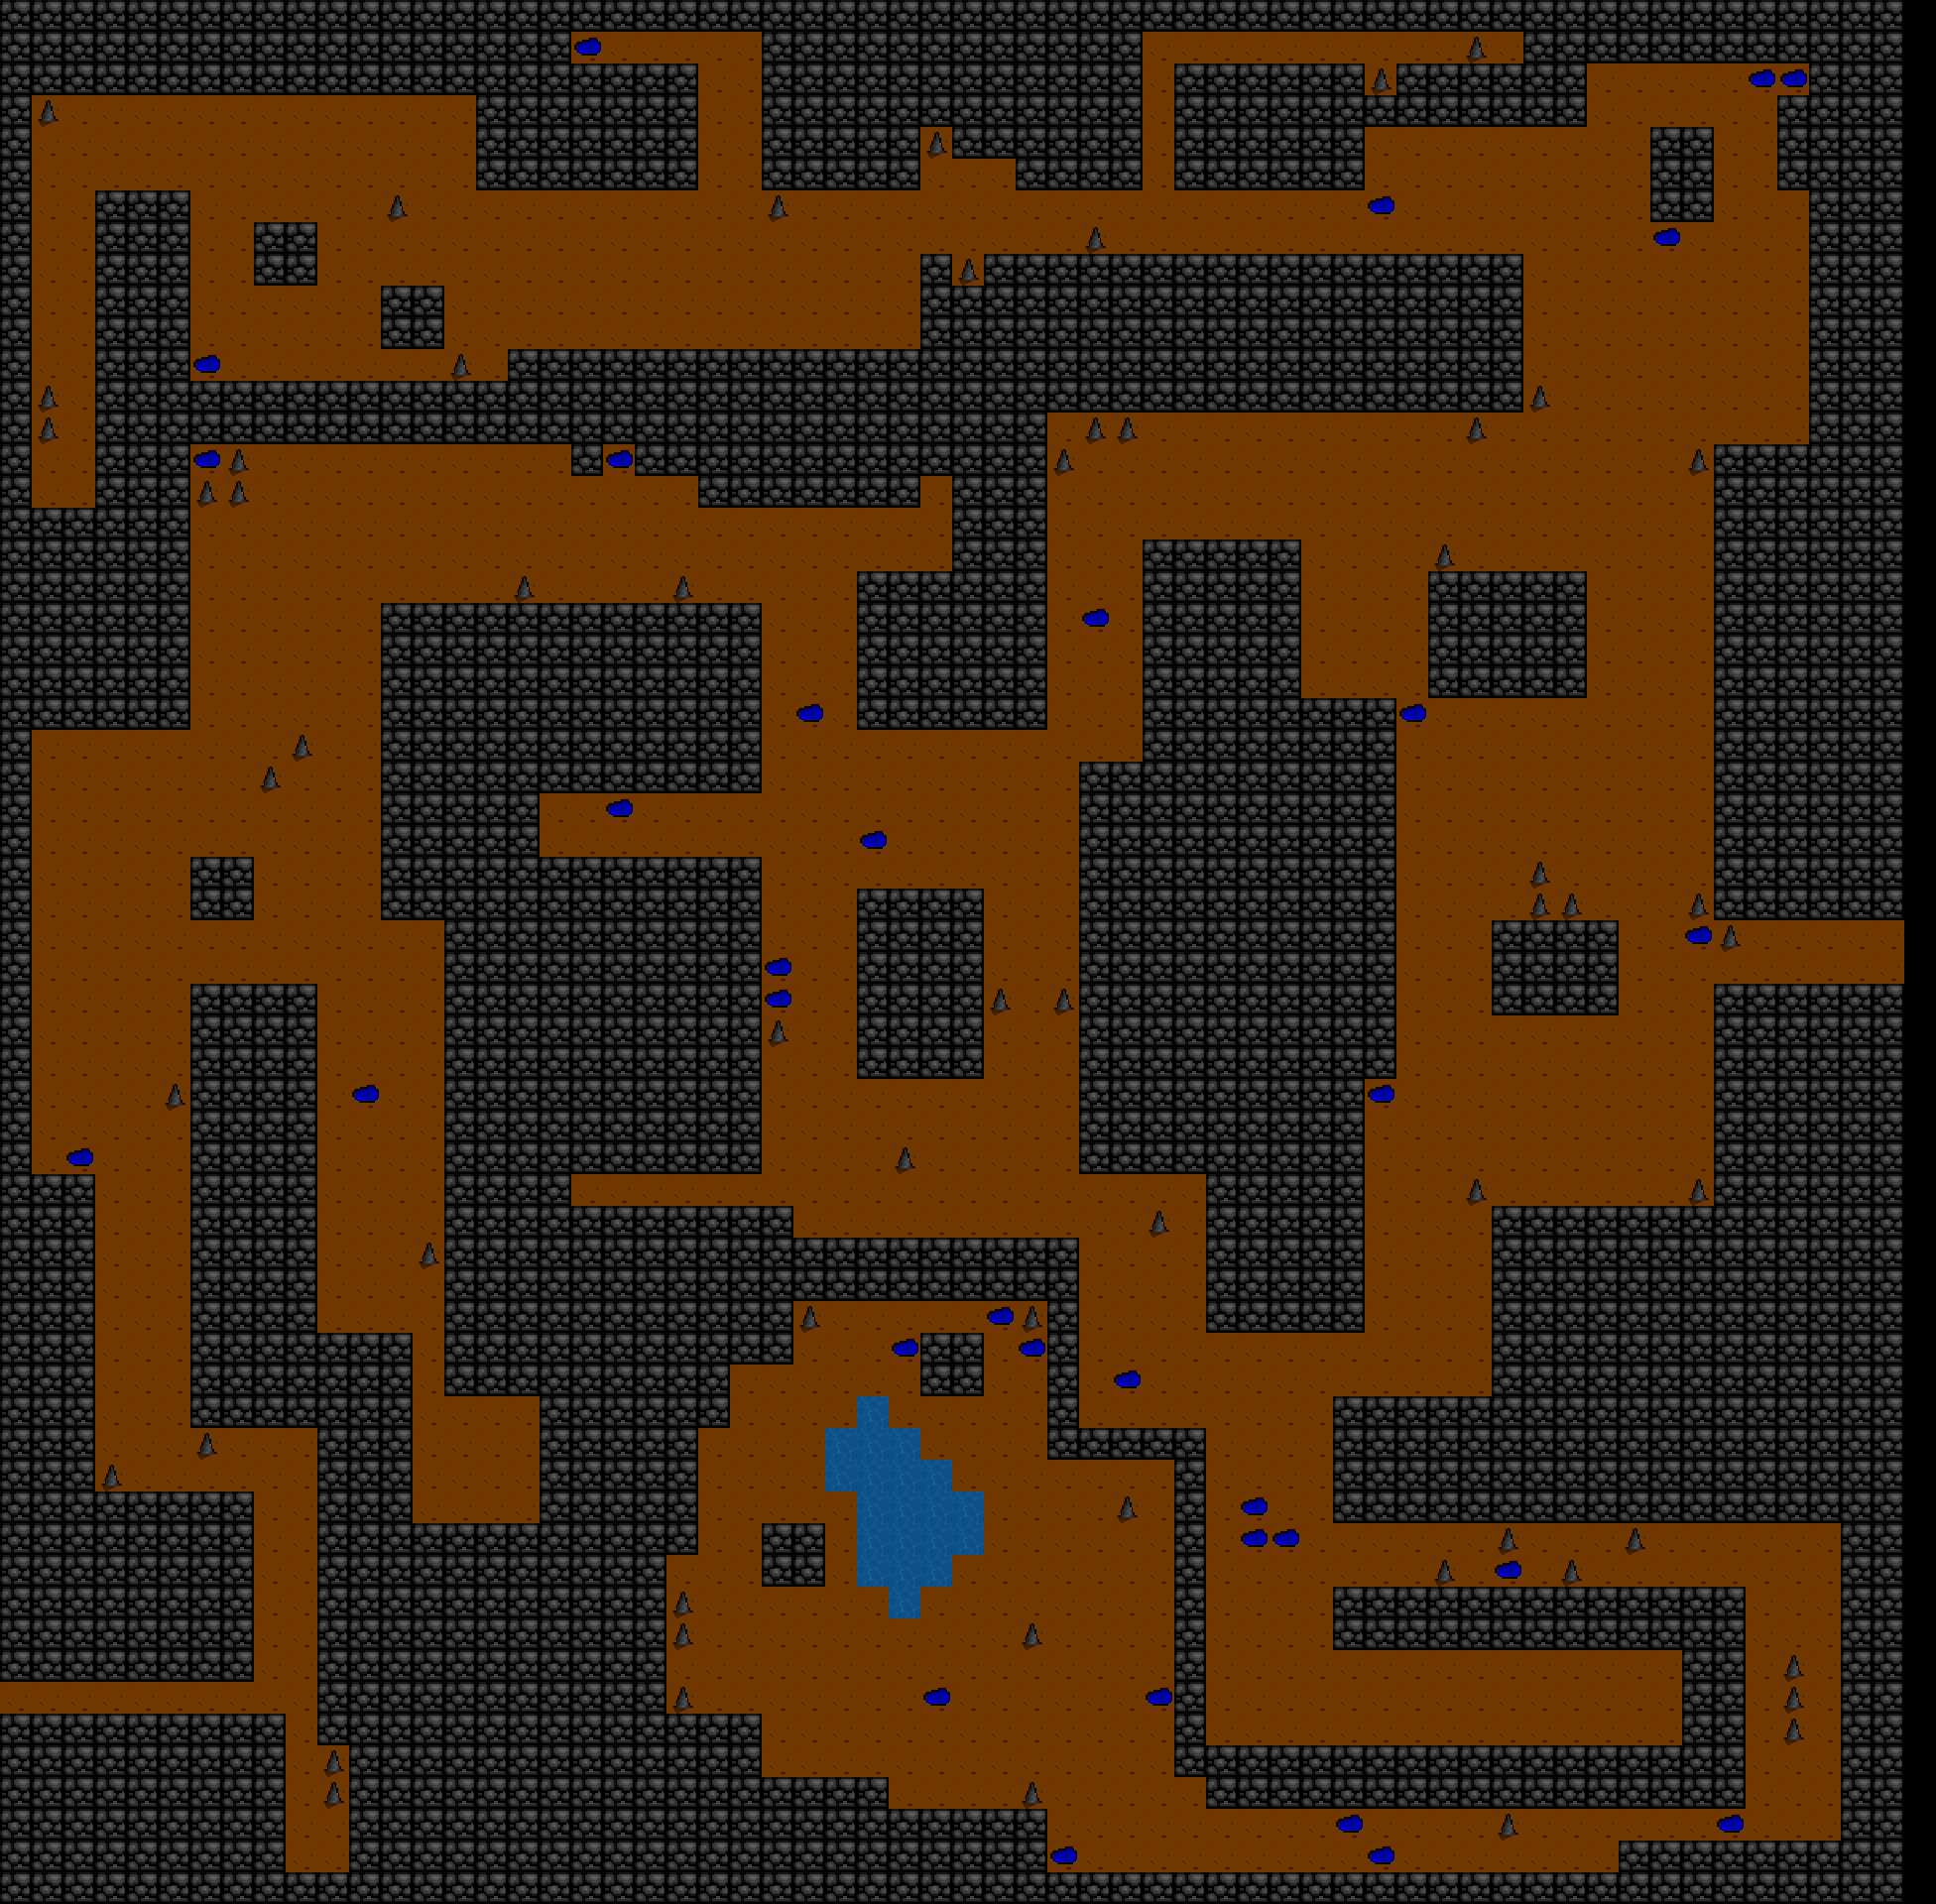
| # | Stairs | Leads to |
|---|---|---|
| 1 | Exit | Not reachable, or it does nothing. |
| 2 | Exit | Not reachable, or it does nothing. |
| 3 | Exit | Out to the world map |
Crystal Mountains
The first map is a maze. Every staircase teleports you to another staircase on the same map.
Puzzle solution (the shortest route)
The shortest way through takes 8 staircases:
- On Crystal Mountains 1, take stair 14. It leads to the same map.
- On Crystal Mountains 1, take stair 1. It leads to the same map.
- On Crystal Mountains 1, take stair 10. It leads to the same map.
- On Crystal Mountains 1, take stair 16. It leads to the same map.
- On Crystal Mountains 1, take stair 18. It leads to the same map.
- On Crystal Mountains 1, take stair 20. It leads to the same map.
- On Crystal Mountains 1, take stair 33. It leads to the same map.
- On Crystal Mountains 1, take stair 36. It leads to Crystal Mountains 2.
Other routes exist, but they are longer. The tables below say what every other staircase does.
Crystal Mountains 1
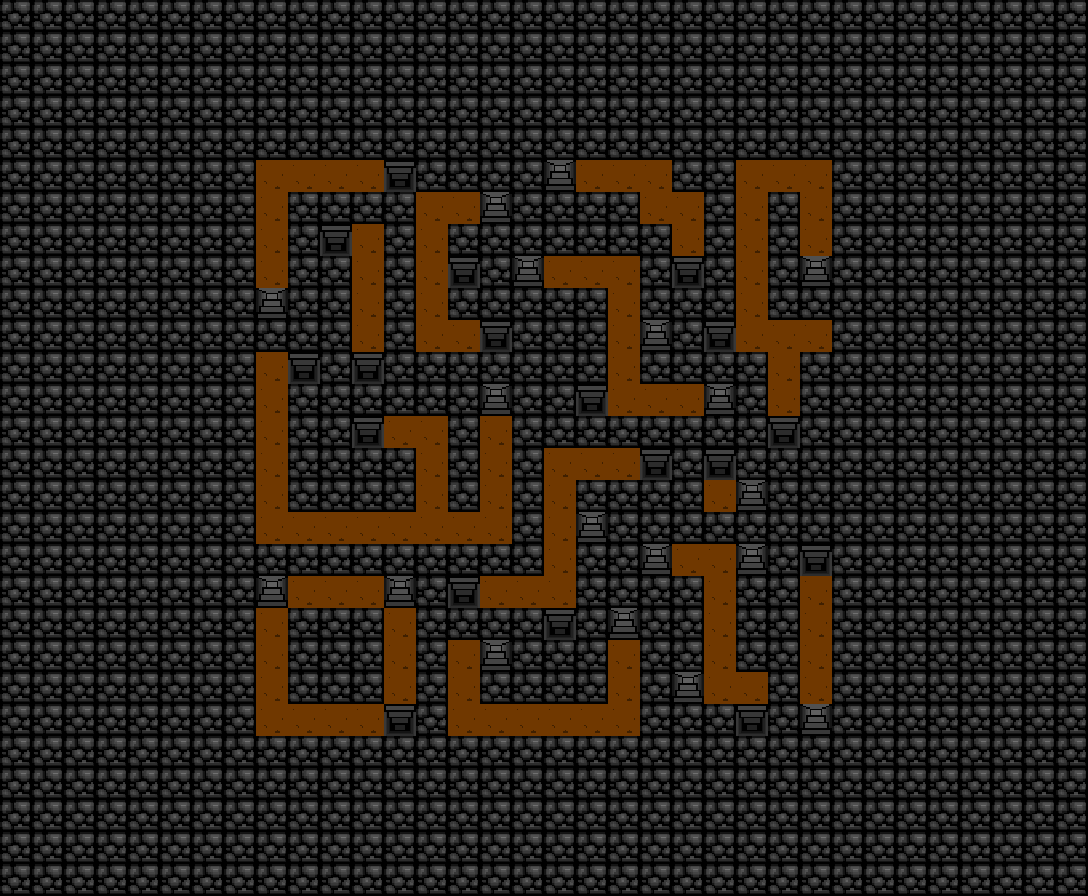
| # | Stairs | Leads to |
|---|---|---|
| 1 | Down | Crystal Mountains 1: you appear at stair 3 Gets you closer |
| 2 | Up | Crystal Mountains 1: you appear at stair 5 Gets you closer |
| 3 | Up | Crystal Mountains 1: you appear at stair 1 Sends you back |
| 4 | Down | Out to the world map Leads back out |
| 5 | Down | Crystal Mountains 1: you appear at stair 2 Sends you back |
| 6 | Up | Crystal Mountains 1: you appear at stair 10 Sends you back |
| 7 | Down | Crystal Mountains 1: you appear at stair 8 Gets you closer |
| 8 | Up | Crystal Mountains 1: you appear at stair 7 Sends you back |
| 9 | Up | Crystal Mountains 1: you appear at stair 14 Sends you back |
| 10 | Down | Crystal Mountains 1: you appear at stair 6 Gets you closer |
| 11 | Up | Crystal Mountains 1: you appear at stair 12 Sends you back |
| 12 | Down | Crystal Mountains 1: you appear at stair 11 Gets you closer |
| 13 | Down | Crystal Mountains 1: you appear at stair 27 A detour, no closer |
| 14 | Down | Crystal Mountains 1: you appear at stair 9 Gets you closer |
| 15 | Up | Crystal Mountains 1: you appear at stair 16 Sends you back |
| 16 | Down | Crystal Mountains 1: you appear at stair 15 Gets you closer |
| 17 | Up | Crystal Mountains 1: you appear at stair 21 Sends you back |
| 18 | Down | Crystal Mountains 1: you appear at stair 23 Gets you closer |
| 19 | Down | Crystal Mountains 1: you appear at stair 22 A detour, no closer |
| 20 | Down | Crystal Mountains 1: you appear at stair 24 Gets you closer |
| 21 | Down | Crystal Mountains 1: you appear at stair 17 Gets you closer |
| 22 | Up | Crystal Mountains 1: you appear at stair 19 A detour, no closer |
| 23 | Up | Crystal Mountains 1: you appear at stair 18 Sends you back |
| 24 | Up | Crystal Mountains 1: you appear at stair 20 Sends you back |
| 25 | Up | Crystal Mountains 1: you appear at stair 35 Moves you within this map, no progress |
| 26 | Down | Crystal Mountains 1: you appear at stair 33 Sends you back |
| 27 | Up | Crystal Mountains 1: you appear at stair 13 A detour, no closer |
| 28 | Up | Crystal Mountains 1: you appear at stair 29 Gets you closer |
| 29 | Down | Crystal Mountains 1: you appear at stair 28 Sends you back |
| 30 | Down | Crystal Mountains 1: you appear at stair 32 Sends you back |
| 31 | Up | Crystal Mountains 1: you appear at stair 34 A detour, no closer |
| 32 | Up | Crystal Mountains 1: you appear at stair 30 Gets you closer |
| 33 | Up | Crystal Mountains 1: you appear at stair 26 Gets you closer |
| 34 | Down | Crystal Mountains 1: you appear at stair 31 A detour, no closer |
| 35 | Down | Crystal Mountains 1: you appear at stair 25 Moves you within this map, no progress |
| 36 | Up | Crystal Mountains 2, stair 1 The way through |
Crystal Mountains 2
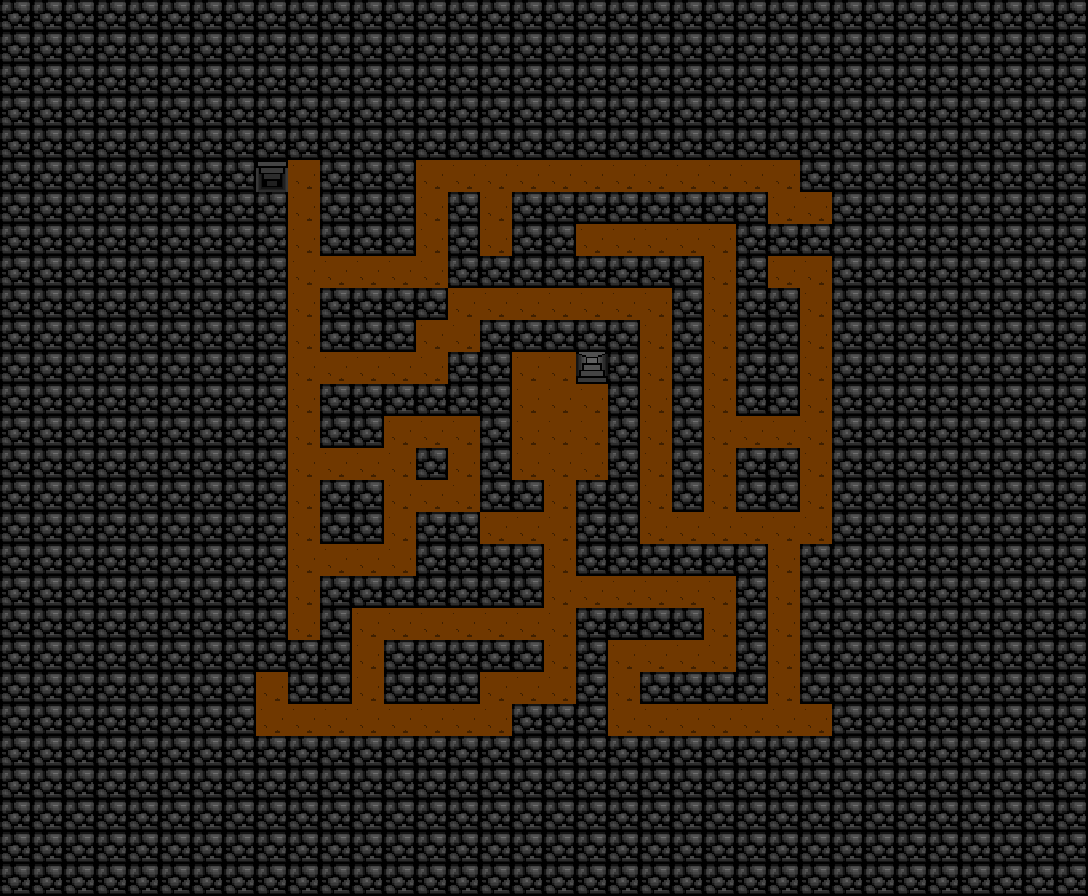
| # | Stairs | Leads to |
|---|---|---|
| 1 | Down | Crystal Mountains 1, stair 36 |
| 2 | Up | Crystal Mountains 3, stair 1 |
Crystal Mountains 3
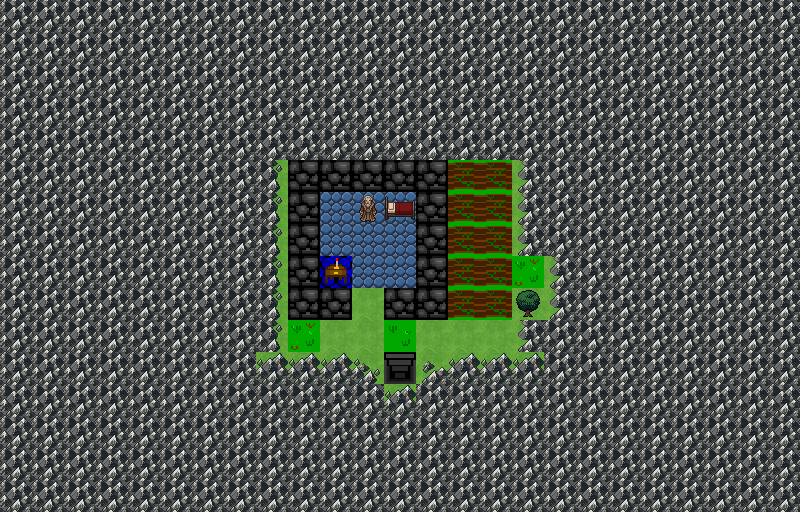
| # | Stairs | Leads to |
|---|---|---|
| 1 | Down | Crystal Mountains 2, stair 2 |
Dwarven Caves
Caves A to E are a puzzle: most staircases send you back to a cave you have already been through.
Puzzle solution (the shortest route)
The shortest way through takes 4 staircases:
- On Dwarven Caves A, take stair 3. It leads to Dwarven Caves C.
- On Dwarven Caves C, take stair 1. It leads to Dwarven Caves D.
- On Dwarven Caves D, take stair 3. It leads to Dwarven Caves E.
- On Dwarven Caves E, take stair 1. It leads to Dwarf City.
Other routes exist, but they are longer. The tables below say what every other staircase does.
Dwarven Caves 1
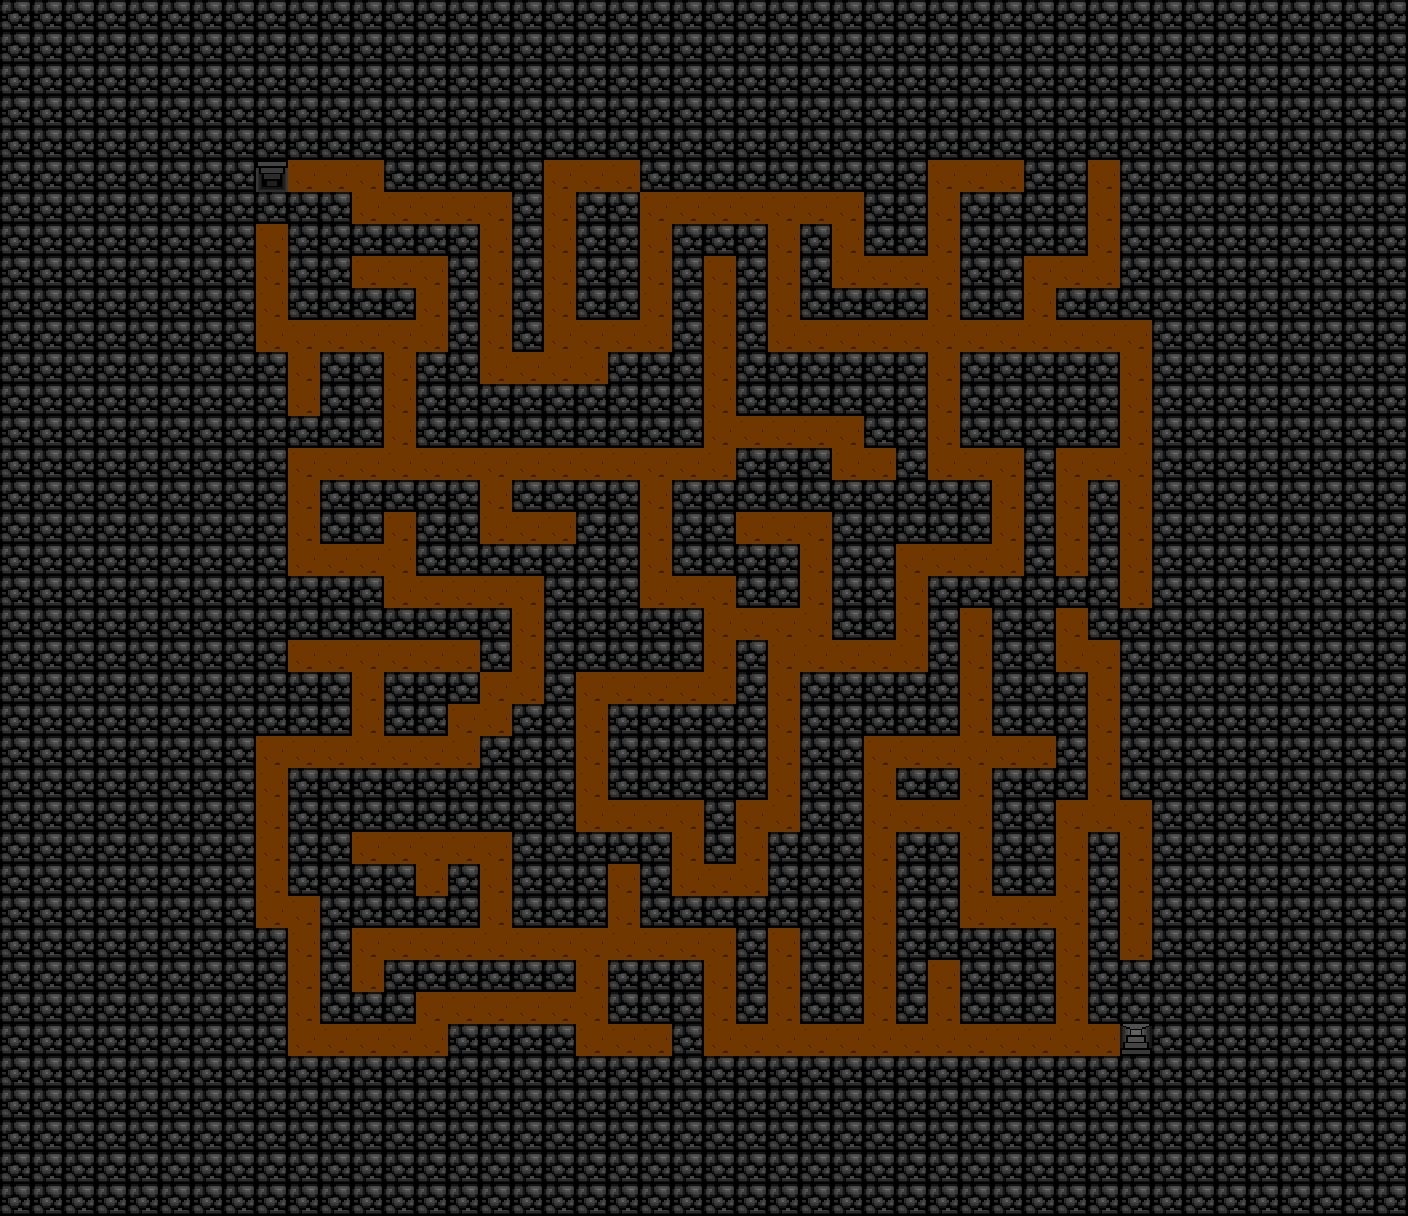
| # | Stairs | Leads to |
|---|---|---|
| 1 | Down | Dwarf City, stair 2 |
| 2 | Up | Out to the world map |
Dwarf City
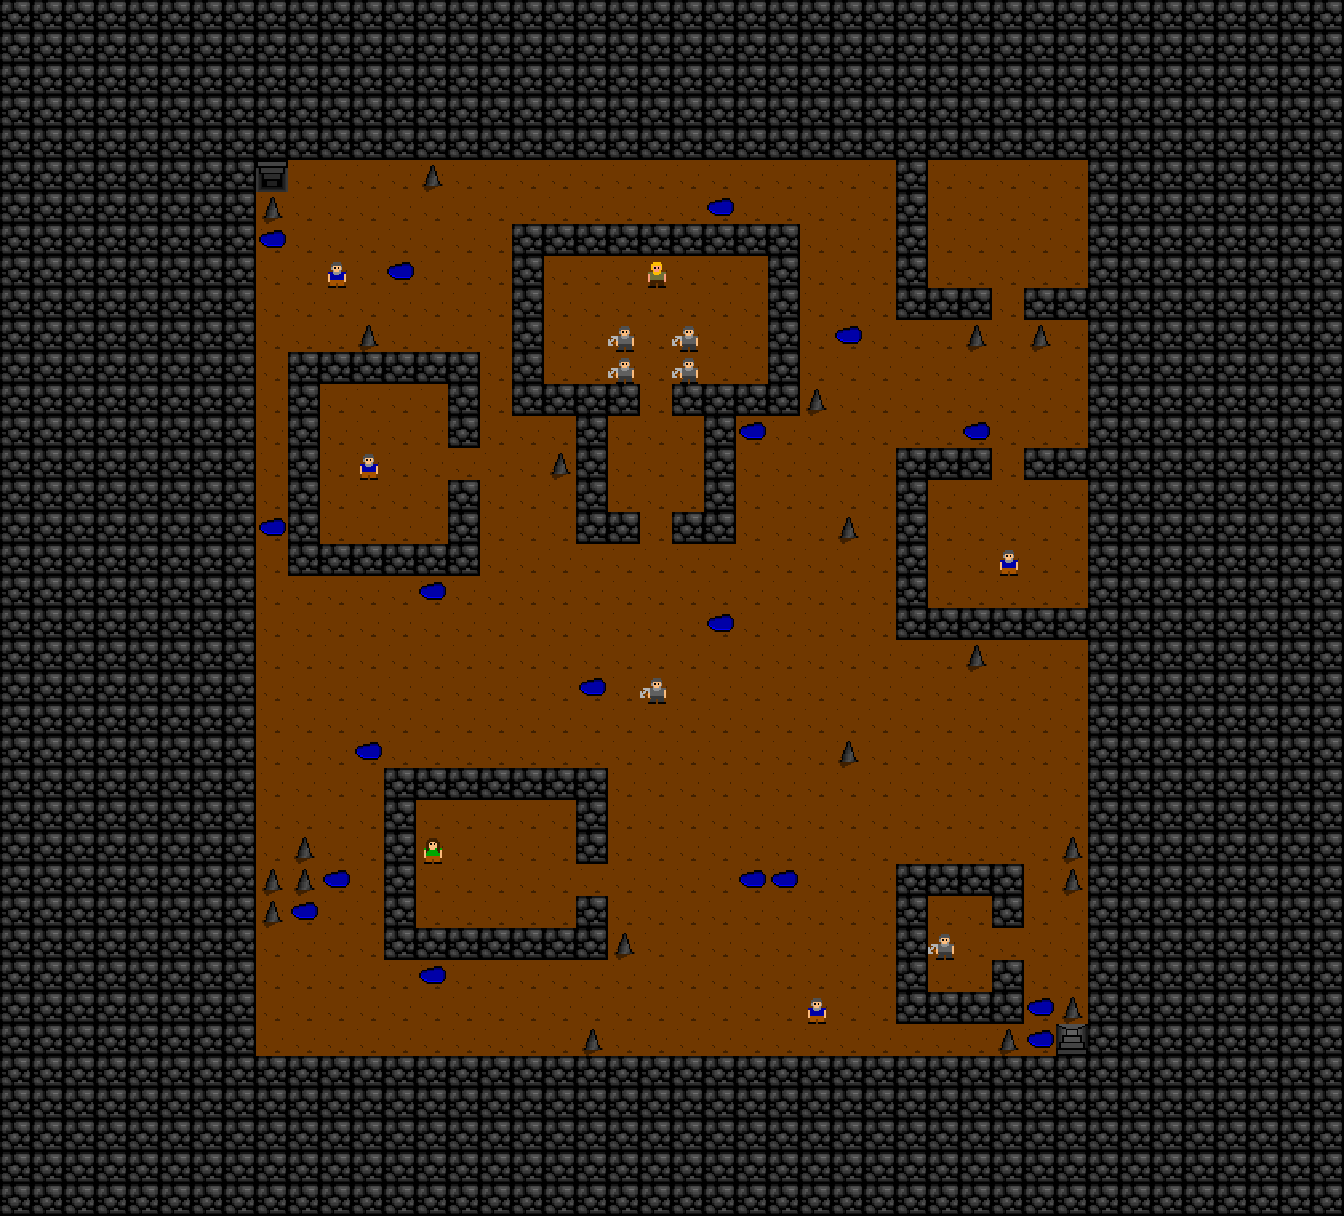
| # | Stairs | Leads to |
|---|---|---|
| 1 | Down |
Depending on your progress: You stay where you are “You don't see any reason to go back down there.” Depending on your progress: Dwarven Caves 2, stair 1 |
| 2 | Up | Dwarven Caves 1, stair 1 |
Dwarven Caves 2
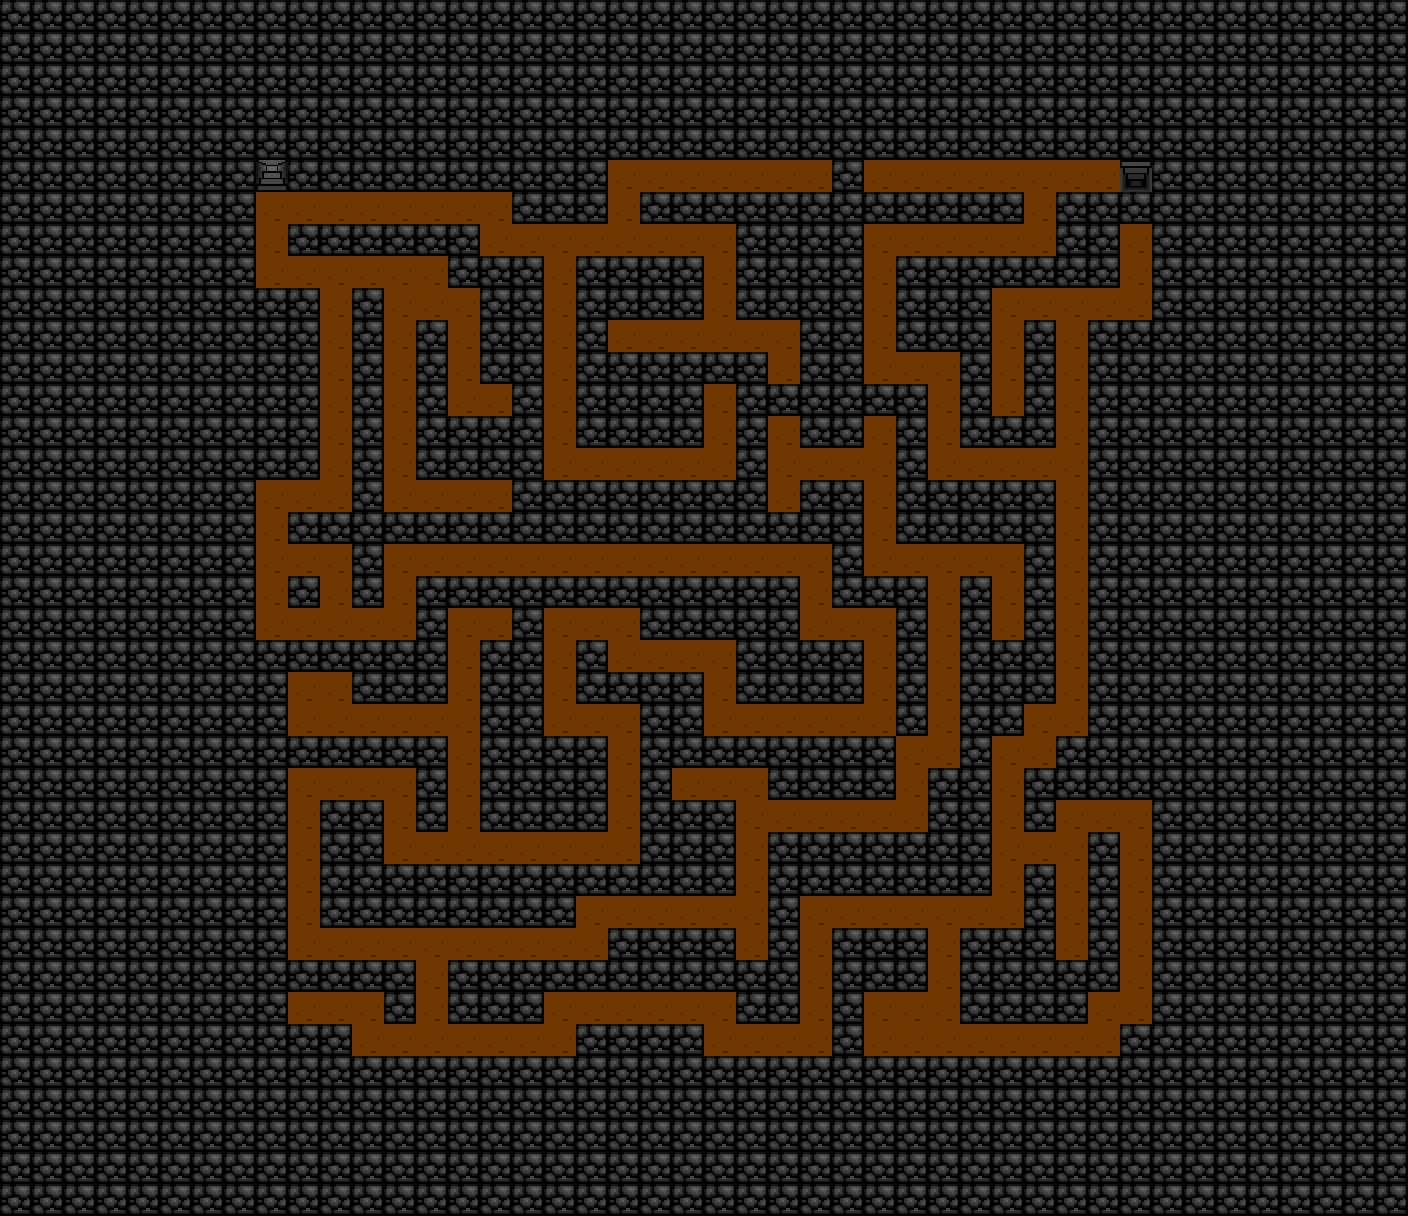
| # | Stairs | Leads to |
|---|---|---|
| 1 | Up | Dwarf City, stair 1 |
| 2 | Down | Dwarven Caves A, stair 1 |
Dwarven Caves A
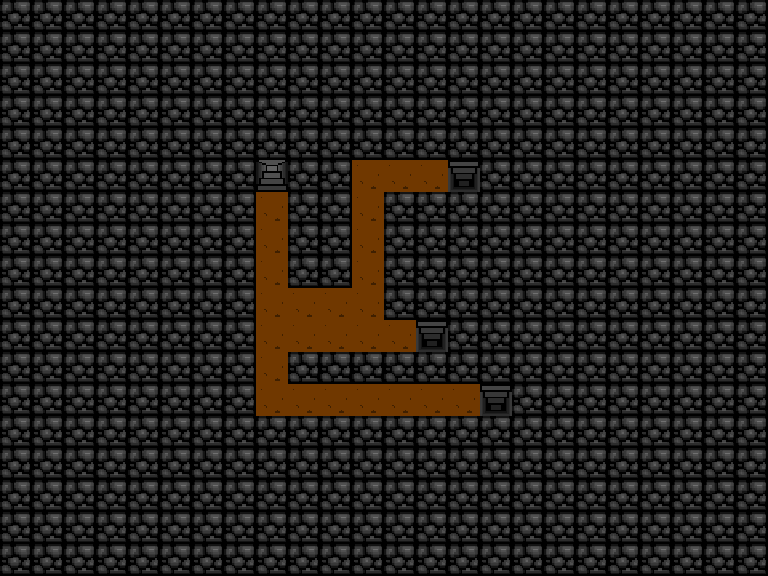
| # | Stairs | Leads to |
|---|---|---|
| 1 | Up | Dwarven Caves 2, stair 2 Leads back out |
| 2 | Down | Dwarven Caves B, stair 4 A detour, no closer |
| 3 | Down | Dwarven Caves C, stair 4 Gets you closer |
| 4 | Down | Dwarven Caves A: you appear at stair 1 Moves you within this map, no progress |
Dwarven Caves B
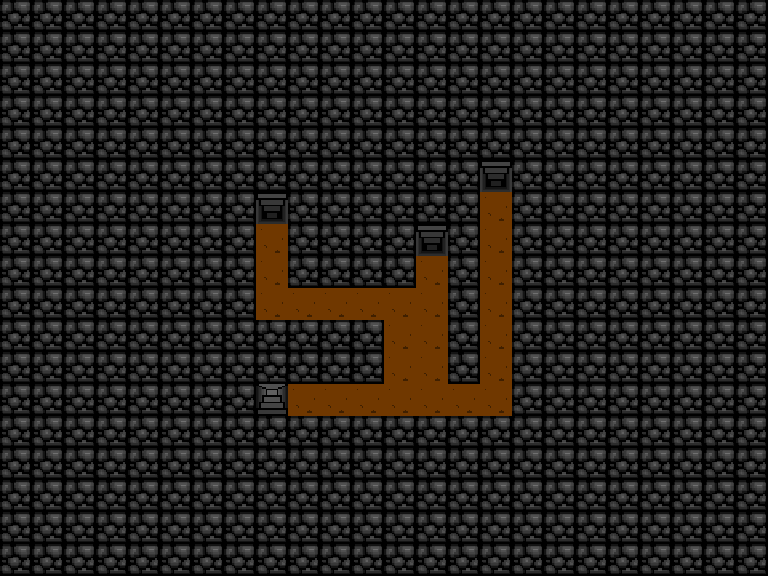
| # | Stairs | Leads to |
|---|---|---|
| 1 | Down | Dwarven Caves B: you appear at stair 4 Moves you within this map, no progress |
| 2 | Down | Dwarven Caves A, stair 1 A detour, no closer |
| 3 | Down | Dwarven Caves C, stair 4 Gets you closer |
| 4 | Up | Dwarven Caves A, stair 1 A detour, no closer |
Dwarven Caves C
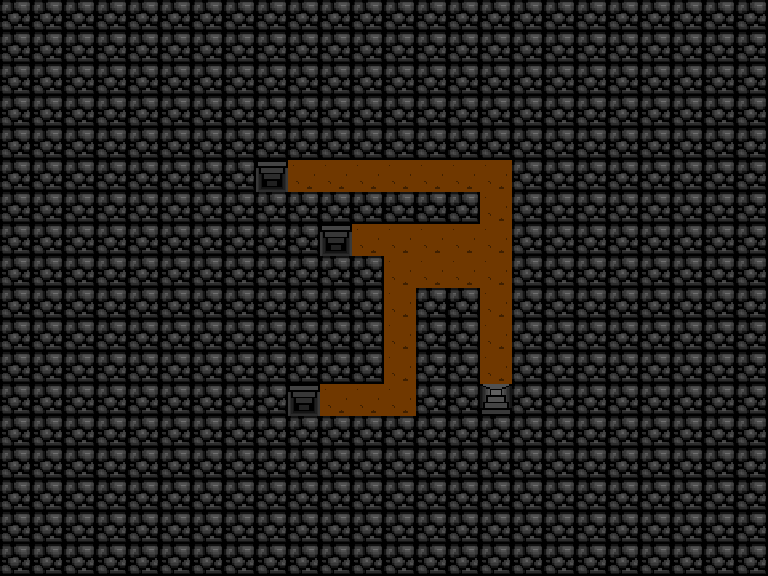
| # | Stairs | Leads to |
|---|---|---|
| 1 | Down | Dwarven Caves D, stair 1 Gets you closer |
| 2 | Down | Dwarven Caves A, stair 1 Sends you back |
| 3 | Down | Dwarven Caves B, stair 4 Sends you back |
| 4 | Up | You stay where you are Nothing happens |
Dwarven Caves D
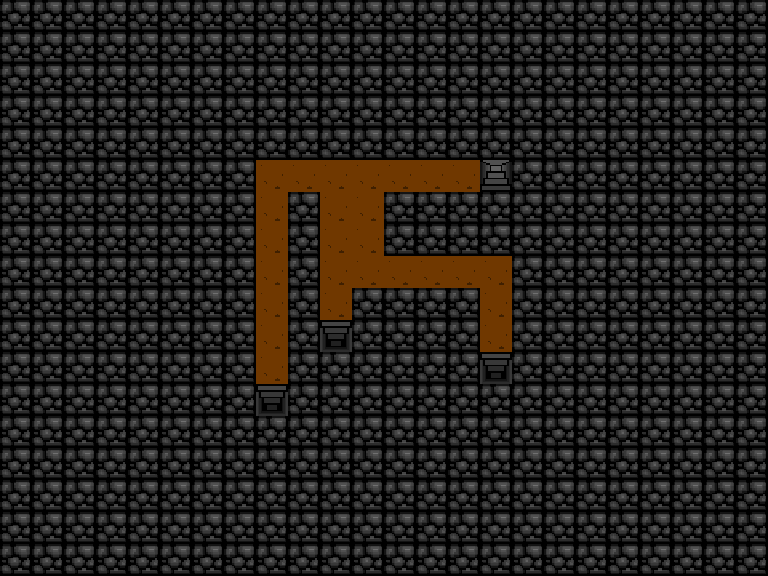
| # | Stairs | Leads to |
|---|---|---|
| 1 | Up | Dwarven Caves B, stair 4 Sends you back |
| 2 | Down | Dwarven Caves A, stair 1 Sends you back |
| 3 | Down | Dwarven Caves E, stair 1 Gets you closer |
| 4 | Down | Dwarven Caves A, stair 1 Sends you back |
Dwarven Caves E
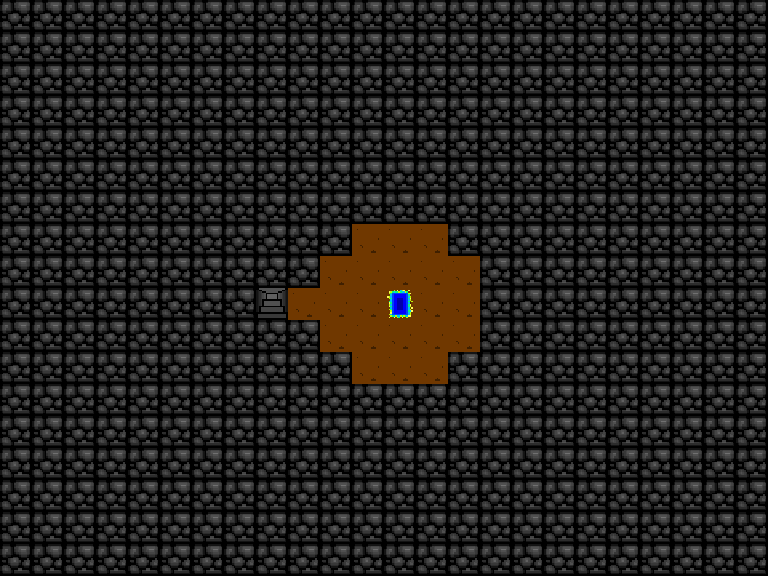
| # | Stairs | Leads to |
|---|---|---|
| 1 | Up | Dwarf City, stair 1 The way through |
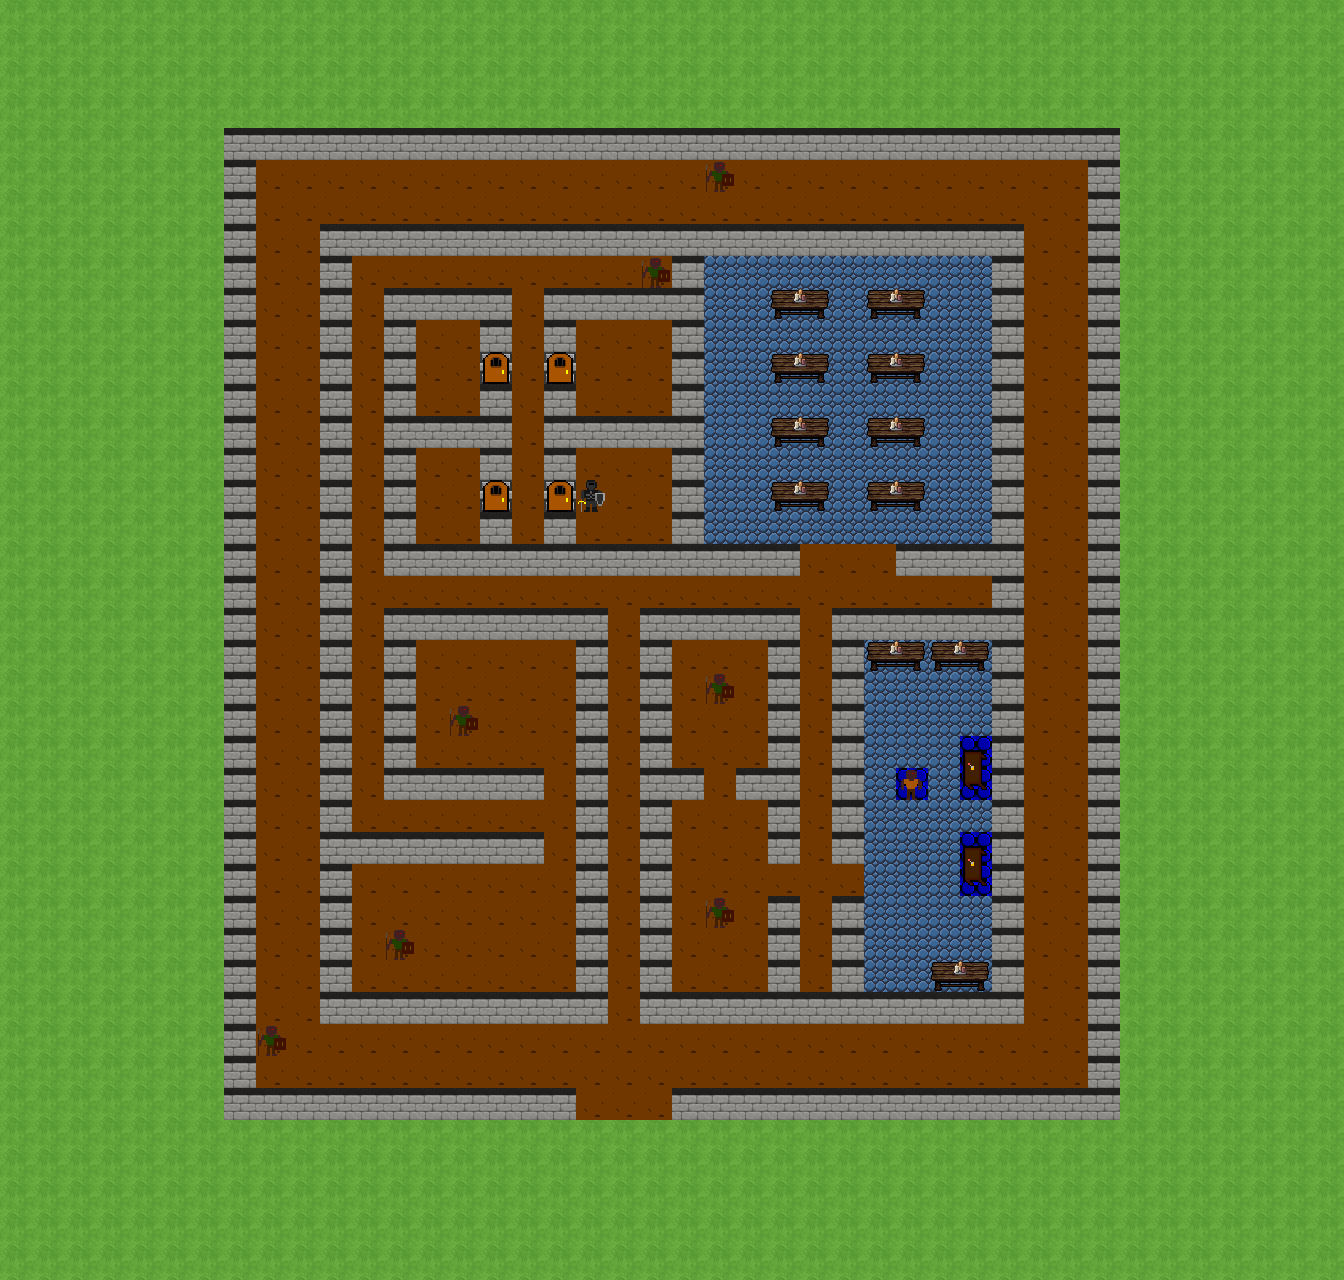
Dark Goblin Stronghold
Dark Goblin Stronghold
Laendlich Dungeon
Levels 1 and 1b are the same place. The game shows 1b once the magical barrier is gone.
Laendlich Dungeon 1
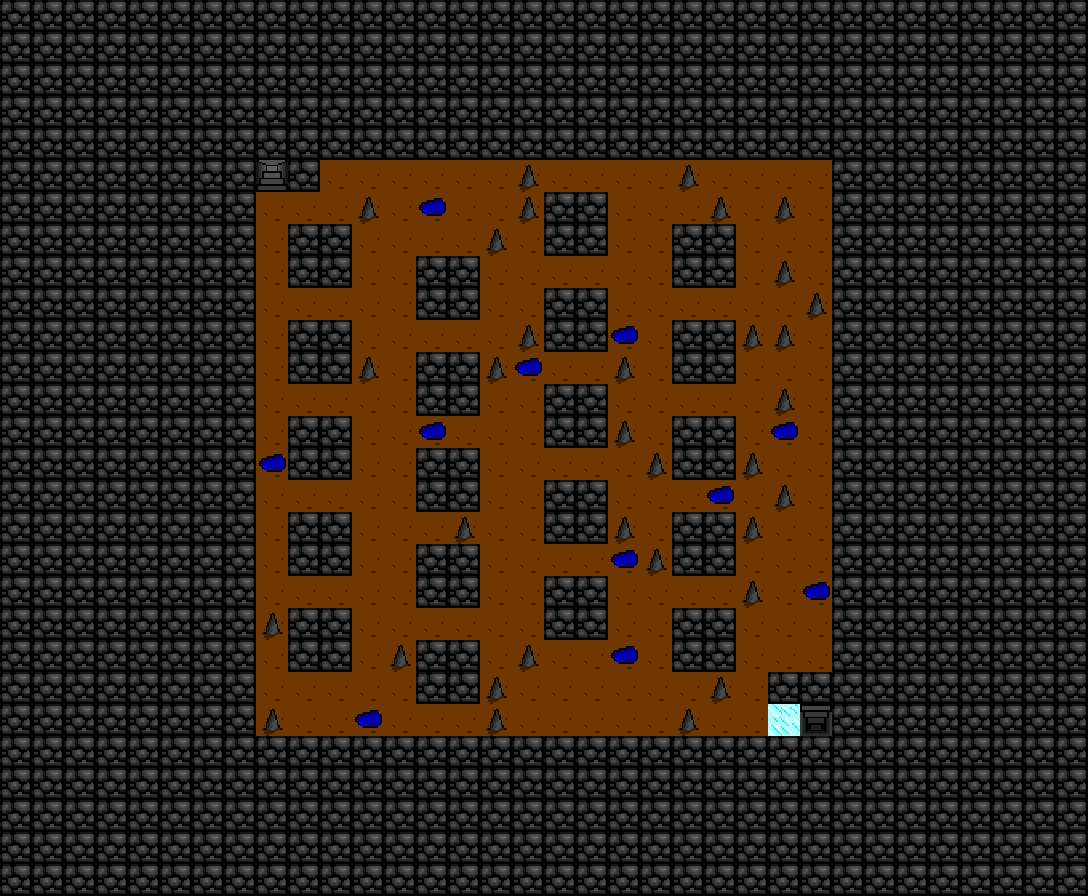
| # | Stairs | Leads to |
|---|---|---|
| 1 | Up | Out to the world map |
| 2 | Down | Not reachable, or it does nothing. |
Laendlich Dungeon 1b
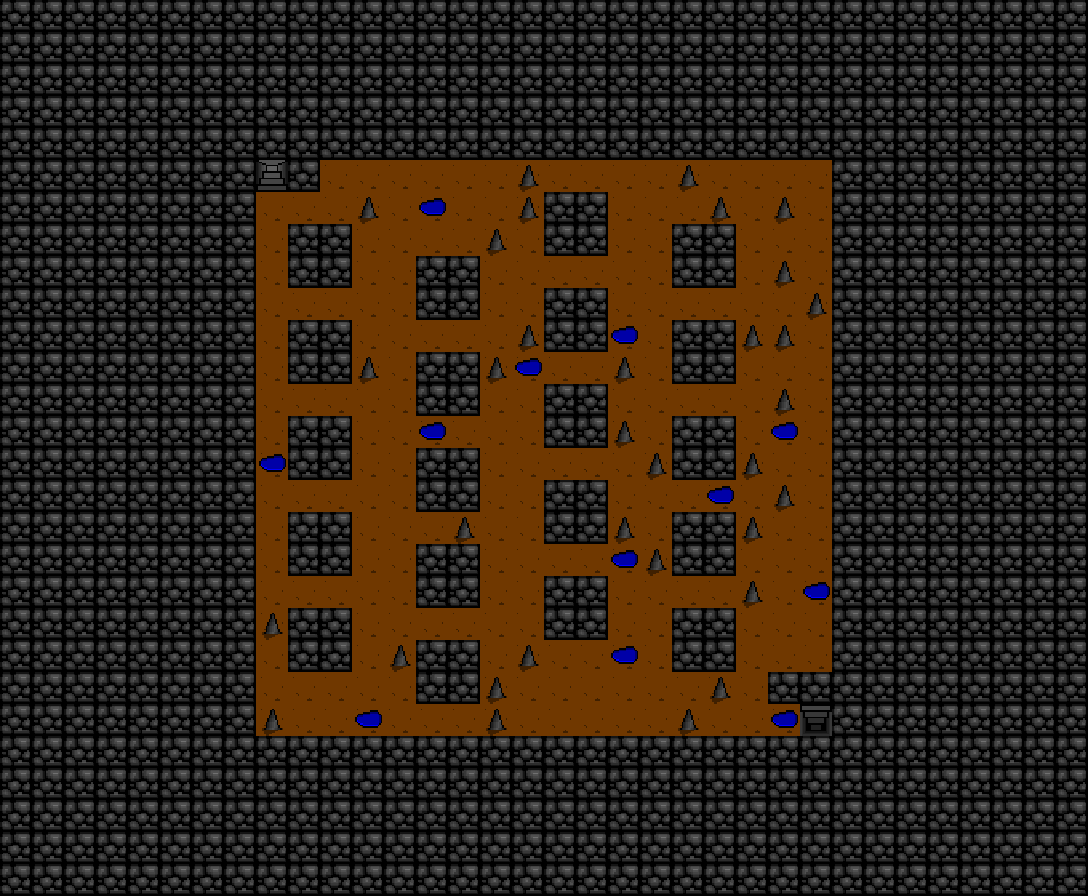
| # | Stairs | Leads to |
|---|---|---|
| 1 | Up | Out to the world map |
| 2 | Down | Laendlich Dungeon 2, stair 2 |
Laendlich Dungeon 2
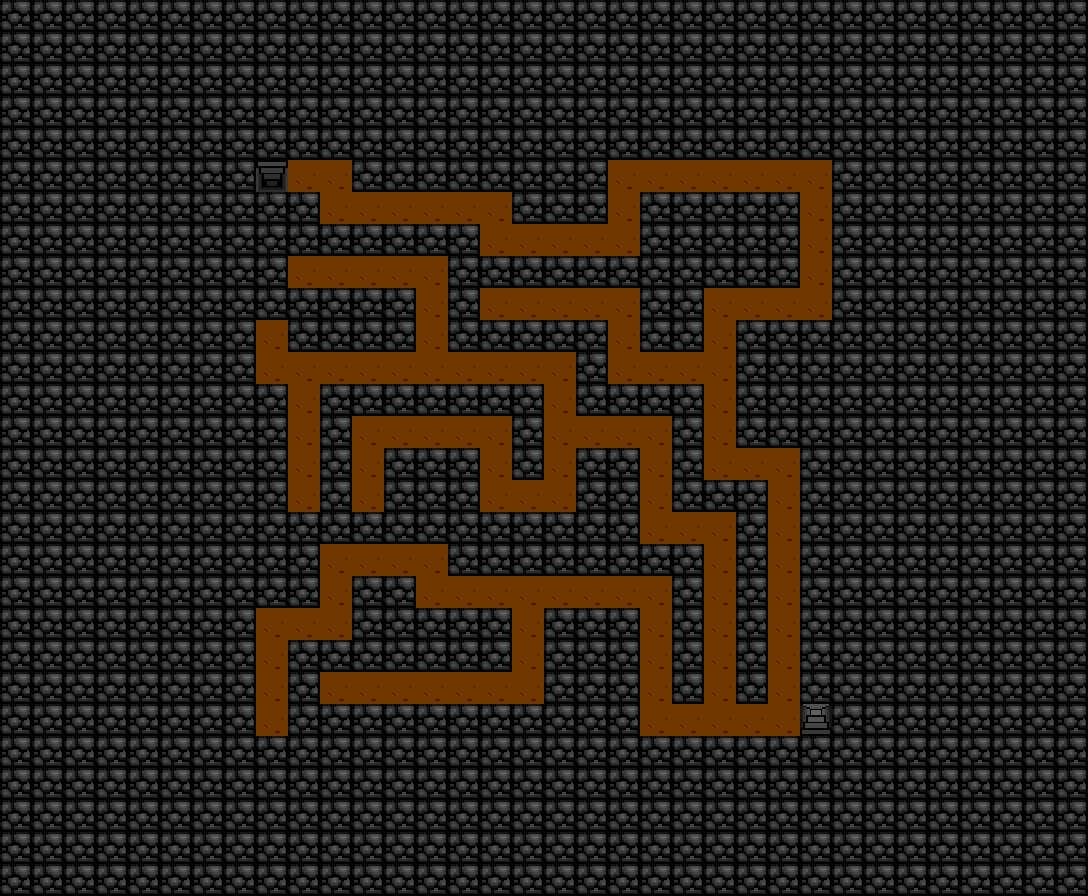
| # | Stairs | Leads to |
|---|---|---|
| 1 | Down | Laendlich Dungeon 3, stair 1 |
| 2 | Up | Laendlich Dungeon 1b, stair 2 |
Laendlich Dungeon 3
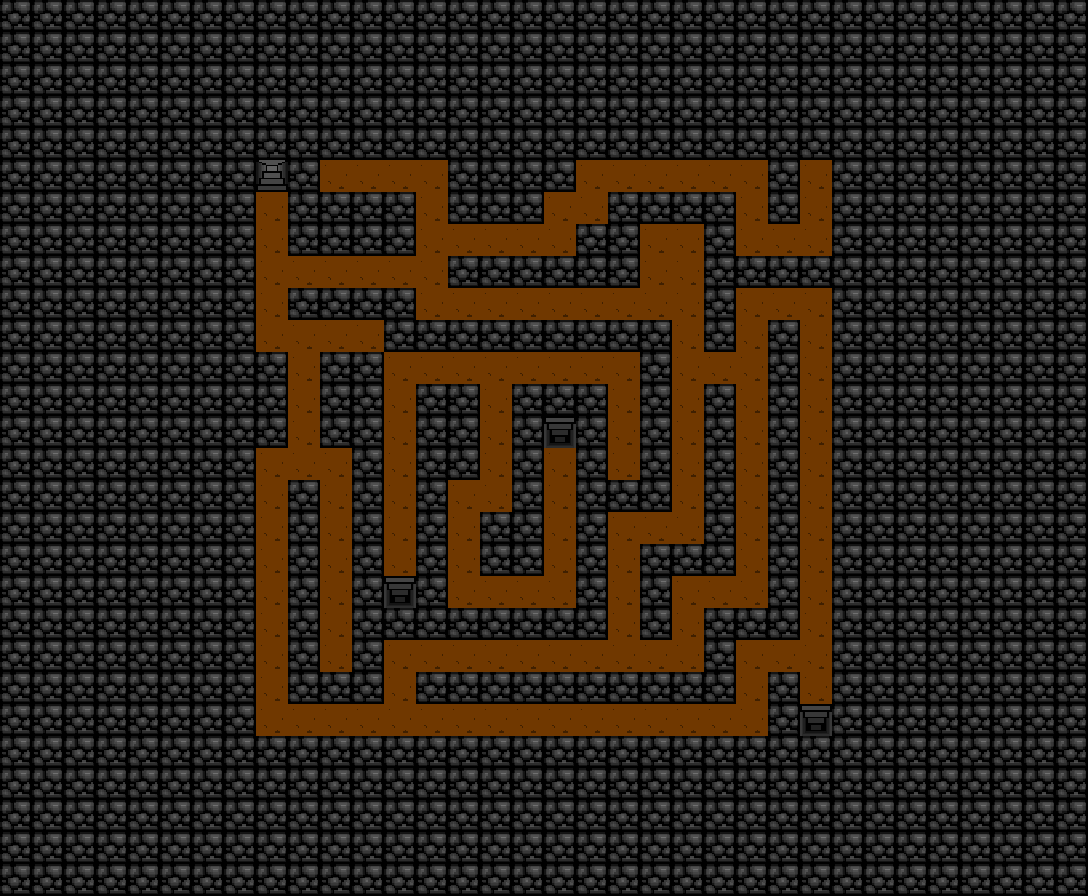
| # | Stairs | Leads to |
|---|---|---|
| 1 | Up | Laendlich Dungeon 2, stair 1 |
| 2 | Down | Laendlich Dungeon 4, stair 2 |
| 3 | Down | Laendlich Dungeon 4, stair 1 |
| 4 | Down | Laendlich Dungeon 4, stair 4 |
Laendlich Dungeon 4
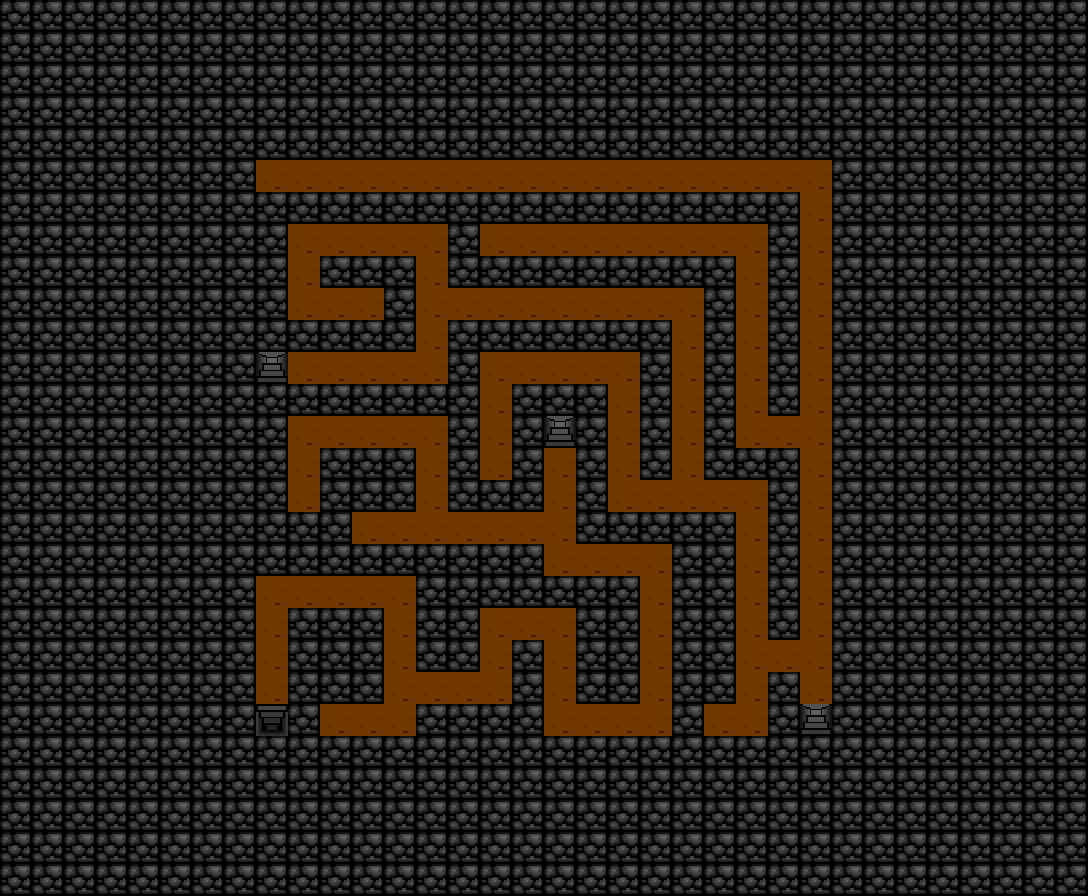
| # | Stairs | Leads to |
|---|---|---|
| 1 | Up | Laendlich Dungeon 3, stair 3 |
| 2 | Up | Laendlich Dungeon 3, stair 2 |
| 3 | Down | Laendlich Dungeon 5, stair 1 |
| 4 | Up | Laendlich Dungeon 3, stair 4 |
Laendlich Dungeon 5
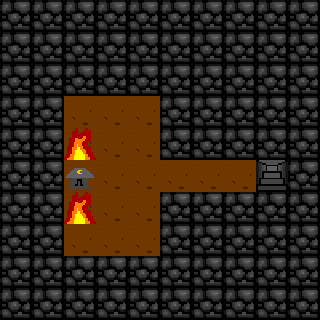
| # | Stairs | Leads to |
|---|---|---|
| 1 | Up | Laendlich Dungeon 4, stair 3 |
The Rift
The Rift 1
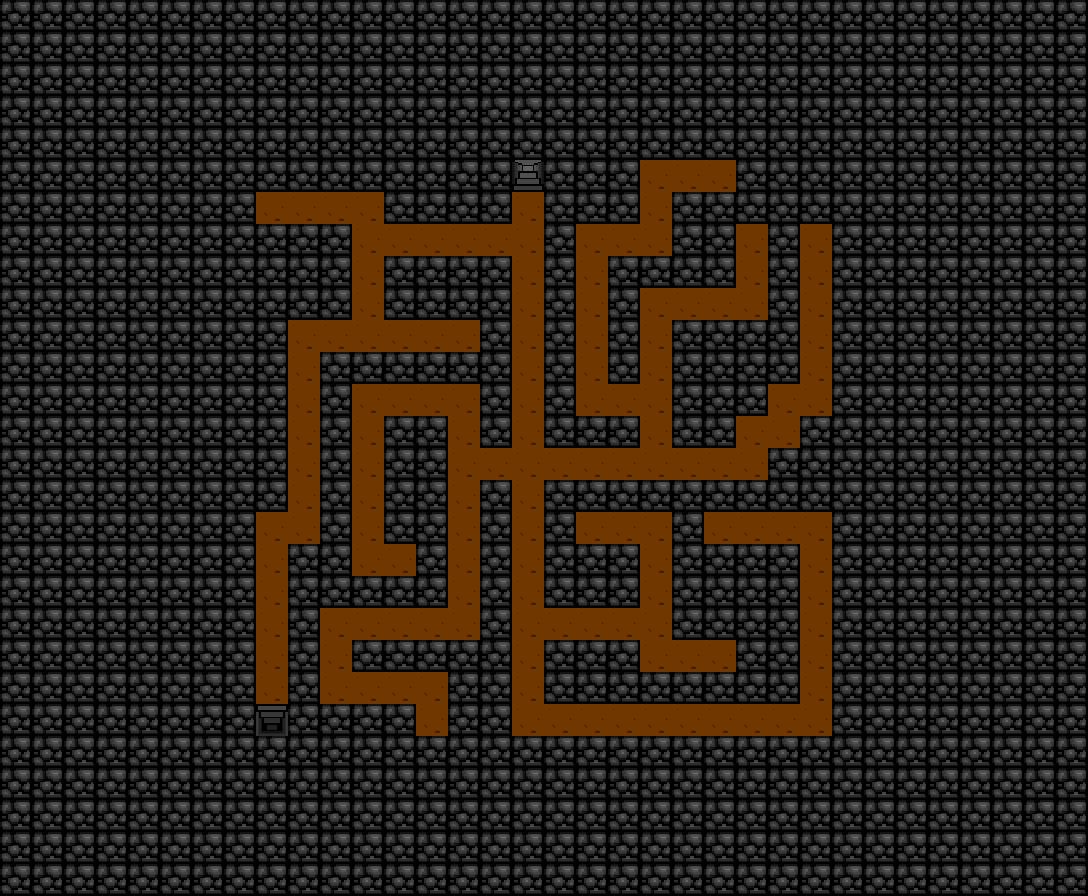
| # | Stairs | Leads to |
|---|---|---|
| 1 | Up | Out to the world map |
| 2 | Down | The Rift 2, stair 2 |
The Rift 2
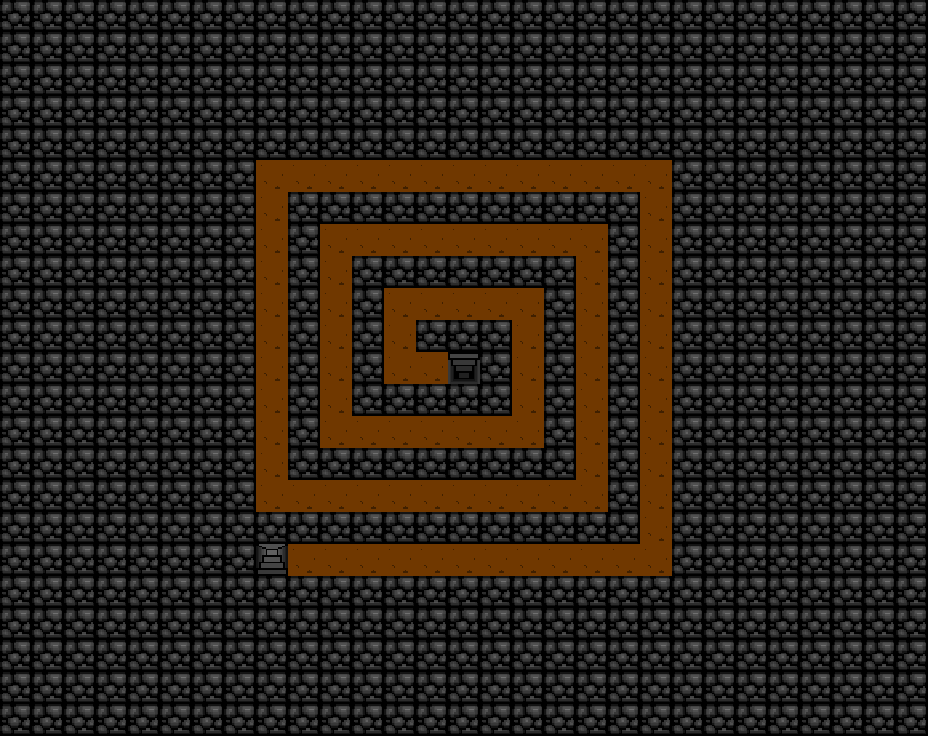
| # | Stairs | Leads to |
|---|---|---|
| 1 | Down |
The Rift 3, stair 1
“Before you is a dark alter. Eternal flames surround it. There is a slight depression in the center and you notice that it fits the medallion.” “This is it, you decide. Once you place that medallion, there is no going back.” |
| 2 | Up | The Rift 1, stair 2 |
The Rift 3
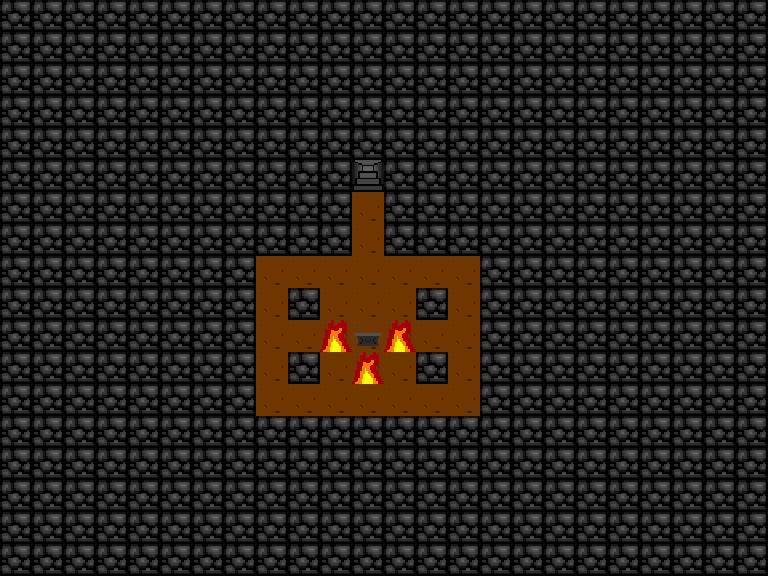
| # | Stairs | Leads to |
|---|---|---|
| 1 | Up | The Rift 2, stair 1 |
The New Continent and Greyor's Castle
The New Continent
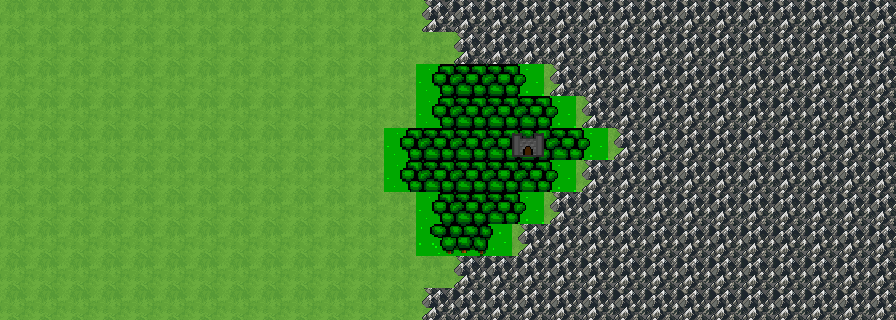
| # | Stairs | Leads to |
|---|---|---|
| 1 | Exit | Out to Castle Garrison |
Greyor's Castle
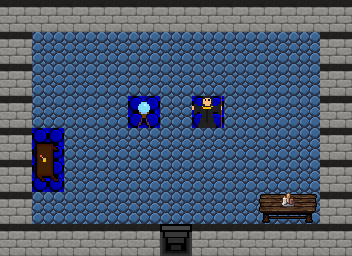
| # | Stairs | Leads to |
|---|---|---|
| 1 | Down | Not reachable, or it does nothing. |